This post is a part of blogpost series to show case building a cross platform mobile application in java using mgwt, gwt-phonegap and Apache Cordova 3.
Eclipse:
Download eclipse (Eclipse IDE for Java EE Developers) from the below link, if eclipse is not installed on your system.
Extract the downloaded eclipse zip file on your system.
GWT:
Download GWT SDK from the below link it is not already
available on your system.
Download the latest version of GWT and extract the
downloaded zip on your system. The extracted zip looks similar to the below
screen shot.

Now install the GWT plugin for eclipse to your eclipse IDE.
Open your eclipse IDE and select Help à Eclipse Market Place
Search for GWT and select Google Plugin for Eclipse 4.3

Based on the eclipse version you are using you may need to
select a different version instead of 4.3.
Click on confirm in the below screen and also accept all the
license agreements shown during the installation process.

After the installation of plugins is completed, restart
eclipse.
After restart you can see a new button at the top of the
eclipse screen below the menus which provides options for GWT projects.

You will need GWT Developer Plugin to be installed on a browser to see your changes without recompiling every time. Since we are using mgwt which works with Webkit browsers, we will install the plugin for chrome.
Go to Chrome web store and search for GWT Developer plugin
and install it.

Android:
Install the Android SDK from the below link, if it is not
already installed on your system.
Once you download the appropriate zip file for your system
and extract it, the contents should look similar to below.

Double click on SDK Manager.exe to launch the SDK manager.
SDK manager shows the list of available tools, installed
tools and other information. The latest version of Android will be installed by
default.
If you need to develop the applications which are compatible with
older versions of Android, you may need to install the old versions of Android
also by selecting them and click on Install XX packages.
XX is replaced by number of packages that needs to be
installed based on the number of versions you selected for installation.
During the installation you will require to accept the license agreements. Just agree to them and continue the installation.

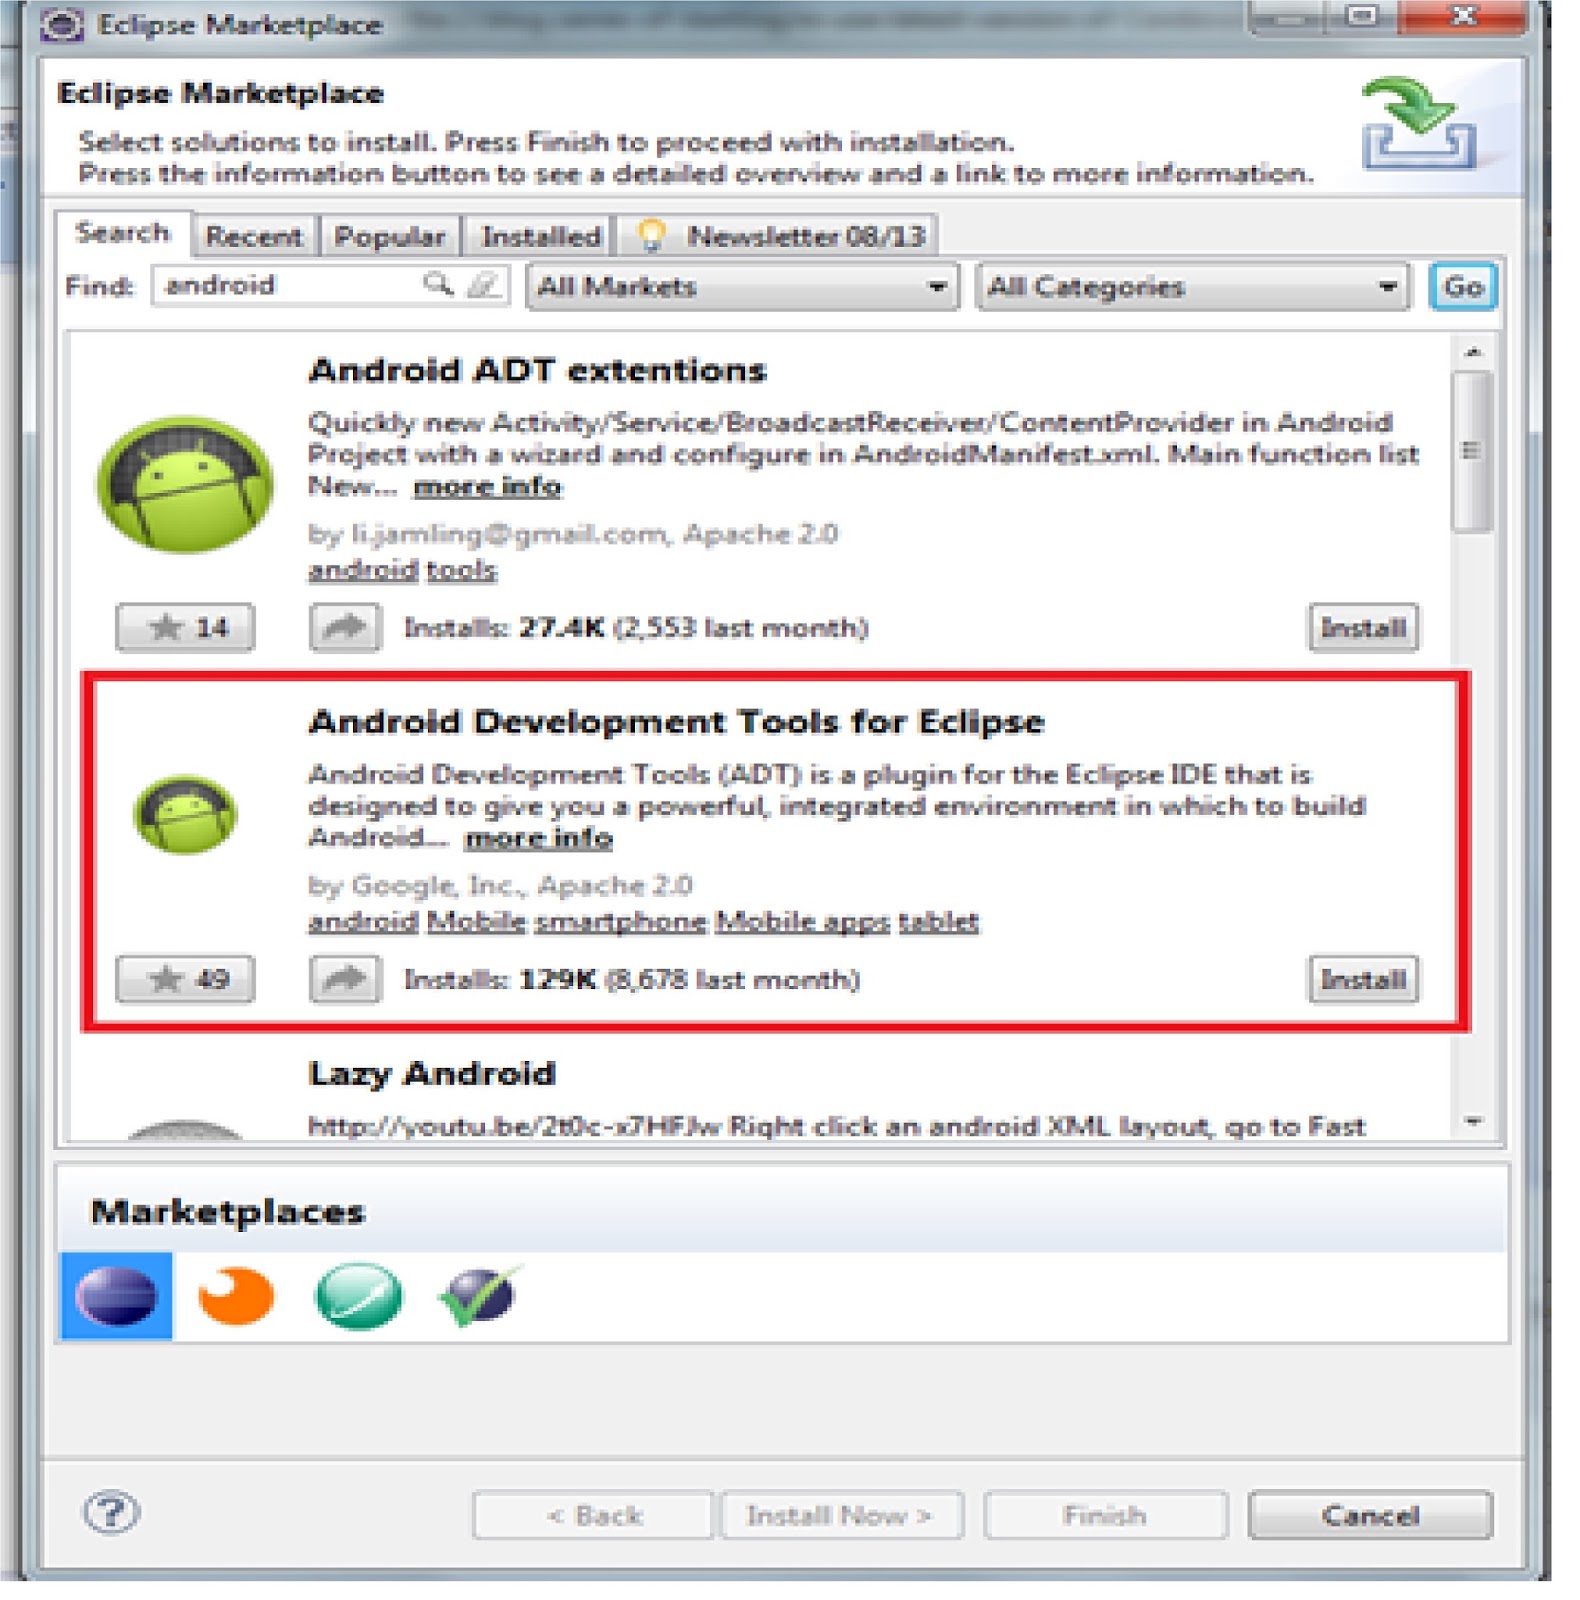
We will need to install the Android plugin for eclipse.
So once again Open your eclipse IDE and select Help à Eclipse Market Place
Search for Android and select Android Development Tools for
Eclipse and click on Install.
Confirm the features that need to be installed.

Accept all the license agreements and continue installing.
Restart eclipse after the installation is completed. After
restart you can select NewàOther
to see the new Android project resources that can be created which confirms
that the Android plugin is installed successfully.

Maven
Download and install the latest version of maven from the below
apache site, it maven is not already installed on your system.
Extract the downloaded zip and set the maven home as a
system variable from System Properties à
Environment Variables à
System variables.

Add the maven bin path to system Path as shown in the below screen
capture.
You need to add ;%M2_HOME%\bin to the existing path
variables.

After the path is configured, open command prompt and run mvn –version to check the version of the maven installed.

Mgwt:
Now that we have installed and configured all the tools we need to build a mobile application, we will start creating a mgwt project.
The following sequence of steps will create a blank mgwt project with the recommended MVP architecture.
Run the following command inside the eclipse workspace.
mvn archetype:generate -DarchetypeRepository=http://www.m-gwt.com/m2/repo -DarchetypeGroupId=com.googlecode.mgwt.archetypes -DarchetypeArtifactId=mgwt-standard-archetype -DarchetypeVersion=1.0.8
This command will start downloading the required dependencies and create a project in the workspace. You need to provide a groupId, an artifactId, a package and the version information.

The groupId normally will be something like com.company name.project name.
The articfactId is a name which contains only characters (no minus, no whitespaces, etc.).
The version will be the version number of your application.
The package name is normally same as the groupid.
After the above data is entered, maven asks for confirmation of
the data entered. Enter Y and press Enter. Maven will create a project with the
parameters entered.

Now that the
project is created, you need to configure your workspace. This step needs to be
done only once per workspace when eclipse is not running. This will create
variable M2_REPO which points to your maven repository to make the dependency
resolution to work inside eclipse.
mvn eclipse:configure-workspace -Declipse.workspace="/path/to/your/workspace"
Replace “/path/to/your/workspace” with your actual workspace path.
Next, run the below command after changing directory into the generated project to create the project and the associated classpath file for eclipse from Maven pom.xml. Whenever the project dependencies change this command needs to be rerun.
mvn eclipse:eclipse

The web app from src/main/webapp needs to be copied into your target folder using the below command.
mvn war:exploded
Now we will import the project in eclipse.
Choose File à Import--> Choose General -> Existing Project into Workspace -> Next

Navigate to the created project folder and choose open. Eclipse should now find the project, and you can import it.

Configuring GWT Eclipse plugin:
Right click on your project and select Properties.

Select Google and expand the node -> Select "Web
Application"
Check the box "This project has a WAR directory" and choose src/main/webapp Uncheck
the box "Launch and deploy from this directory" and Click Ok

Running the mgwt project
Right
click on the project -> Run As -> "Web Application"

The GWT Dev Mode is now starting and you will be asked to select the war directory.
You need
to choose target/"artifactId"-"version" as your war directory. (artifactId and version you chose when you created the project)

Once the application is ready to launch in dev mode it will display an url in the Development mode window of the eclipse.
You can right click on the link and open it or copy the link and paste it in a browser for running.
You need to run this application in chrome since mgwt supports Webkit browsers which scale down to Chrome and Safari.

After the application is launched in chrome, you will see a vertical line. That is fine since we haven’t added any code, and whatever we are seeing is just a mgwt project template that is created.

Thanks for the step by step. This shows how to launch in a browser, but how do you run it as an Android app in the simulator?
ReplyDeleteThis blog post has information on how to create a Cordova Android project. Before adding platforms, replace the code in the root --> www folder with the compiled javascript.
ReplyDeletehttp://codingsquare.blogspot.in/2013/08/creating-cordova-3-android-project.html
PHONEGAP IS UP
ReplyDelete