This is a series on setting up the development environments for various mobile platforms and using the various cordova core API's for developing Apache cordova apps.
Installing NodeJs on Windows
Setting up Mozilla FirefoxOS development environment on Windows.
Setting up Mozilla FirefoxOS development environment on Mac
Setting up Mozilla FirefoxOS development environment on Ubuntu
Setting up Windows Mobile Development environment.
Showing posts with label Android Studio. Show all posts
Showing posts with label Android Studio. Show all posts
Saturday, August 29, 2015

Sunday, September 15, 2013
Installing Android Studio and creating a new Android project on Android Studio.
Android Studio IDE is launched at Google I/O 2013. Android Studio is based on Intellij IDEA which aims to replace Eclipse + Android Developer Tools for Android development. And since Google itself is pushing it, it may catch up with eclipse soon.
Android has its pros and cons compared to eclipse.
+ Android Studio has better support for UI design and coding which comes handy when supporting devices of multiple resolutions.
+ Android Studio also has built in ProGuard and app-signing capabilities.
- As of now Android Studio cannot manage multiple projects in the same window. It opens a separate window for every project. I guess this is from Intellij IDEA and may not change soon.
- Gradle-based build support, but for users migrating from Eclipse this will be a learning curve.
Assuming Android SDK is already installed on your system,Download the latest version of Android Studio from Android Developer site. If not download the Android SDK.
http://developer.android.com/sdk/installing/studio.html

Launch the downloaded EXE file, android-studio-bundle-<version>.exe.
Follow the set up wizard instructions to complete the installation.


Once the installation is completed, launch the IDE by clicking on the Android Studio from Programs.
Android Studio will launch displaying the below splash screen. It will take few seconds to launch the IDE.

Some times the Android Studio(mostly on older versions) may fail to launch displaying the following error.

To work around this issue, launch the Android Studio as Administrator.
In Android home screen, Select Configure --> Project Defaults --> Project Structure -- Android SDK and configure the paths to your JDK and Android SDK.

In the Android Studio home screen, click on 'New Project'.

Once you click on 'New Project', Android Studio will display the below screen for you to provide your application name, module name and package name. Also you can specify the Target SDK, Minimum required SDK, and the Android SDK version with which the application needs to be compiled with. And you specify one of the Android Studio's built in themes.

Next you will need to select the icons that will be displayed when the app is installed on devices. For now, let us leave them as it is and continue by clicking on Next.

Then you need to select which type of activity that needs to be created. Select the activity and click on Next. If you don't know which activity to choose, leave the Blank Activity as it is.

Change the activity names with your preferred activity names and click on Finish.

It will take some time to set up the project first time, since IDE will download several dependencies for gradle and indexing the project etc.

Click on the Run button from the IDE, to start running the project.

Then IDE will prompt you to select a device or emulator from the available list of devices or emulators configured on the system.

Here I have a android emulator android_2_3_3 configured on my system and I select that Android Virtual device and click on Ok.
It will take painfully long time to launch the emulator, if it is not launched earlier. It is recommended to start the emulator manually and choose that emulator from 'Choose a running device' option.

The HelloWorld application we created will be installed into the emulator/device and will be launched.

Android has its pros and cons compared to eclipse.
+ Android Studio has better support for UI design and coding which comes handy when supporting devices of multiple resolutions.
+ Android Studio also has built in ProGuard and app-signing capabilities.
- As of now Android Studio cannot manage multiple projects in the same window. It opens a separate window for every project. I guess this is from Intellij IDEA and may not change soon.
- Gradle-based build support, but for users migrating from Eclipse this will be a learning curve.
Assuming Android SDK is already installed on your system,Download the latest version of Android Studio from Android Developer site. If not download the Android SDK.
http://developer.android.com/sdk/installing/studio.html

Launch the downloaded EXE file, android-studio-bundle-<version>.exe.
Follow the set up wizard instructions to complete the installation.

If JDK is not installed on your system, you will need to install latest version of Java also. Also you will need to set the system variables JDK_HOME and JAVA_HOME.

Choose whether you want to limit the installation for only your profile or all the users using the system.

Select the installation location.


Once the installation is completed, launch the IDE by clicking on the Android Studio from Programs.
Android Studio will launch displaying the below splash screen. It will take few seconds to launch the IDE.

Some times the Android Studio(mostly on older versions) may fail to launch displaying the following error.

To work around this issue, launch the Android Studio as Administrator.
In Android home screen, Select Configure --> Project Defaults --> Project Structure -- Android SDK and configure the paths to your JDK and Android SDK.

In the Android Studio home screen, click on 'New Project'.

Once you click on 'New Project', Android Studio will display the below screen for you to provide your application name, module name and package name. Also you can specify the Target SDK, Minimum required SDK, and the Android SDK version with which the application needs to be compiled with. And you specify one of the Android Studio's built in themes.

Next you will need to select the icons that will be displayed when the app is installed on devices. For now, let us leave them as it is and continue by clicking on Next.

Then you need to select which type of activity that needs to be created. Select the activity and click on Next. If you don't know which activity to choose, leave the Blank Activity as it is.

Change the activity names with your preferred activity names and click on Finish.

It will take some time to set up the project first time, since IDE will download several dependencies for gradle and indexing the project etc.

Click on the Run button from the IDE, to start running the project.

Then IDE will prompt you to select a device or emulator from the available list of devices or emulators configured on the system.

Here I have a android emulator android_2_3_3 configured on my system and I select that Android Virtual device and click on Ok.
It will take painfully long time to launch the emulator, if it is not launched earlier. It is recommended to start the emulator manually and choose that emulator from 'Choose a running device' option.

The HelloWorld application we created will be installed into the emulator/device and will be launched.

Monday, August 26, 2013
Configuring Apache Cordova Android project in Android Studio
The earlier blogpost describes setting of Apache Cordova Android project in eclipse.
There is another good tool Android Studio along with Eclipse for Android development which we will be looking at in this blog post. If you want to continue using Eclipse only as your IDE you can skip. And if you want to try out Android Studio, continue following this blog post.
Android Studio Installation
Android Studio is the latest development built on top of Intellij IDEA. Android Studio is integrated Android development IDE which includes all the required developer tools for development and debugging of Android Applications.
Android Studio is currently available as early access
preview.
Download the latest version of Android studio from the below
website.
Launch the downloaded EXE
file, android-studio-bundle-<version>.exe.
Follow the setup wizard to install Android Studio.
As of now there is no direct way to create a Cordova Android
project for Android Studio.
So we will have to create a Cordova Android project for
eclipse and port it to Android Studio.
Exporting from eclipse
Please check your Eclipse ADT plugin version. If the version
is older than 22.0, upgrade it to the latest version.
In Eclipse,
select File > Export.

In the window that appears,
open Android and
select Generate Gradle build files.

Select the project you want to
export for Android Studio and click Finish.
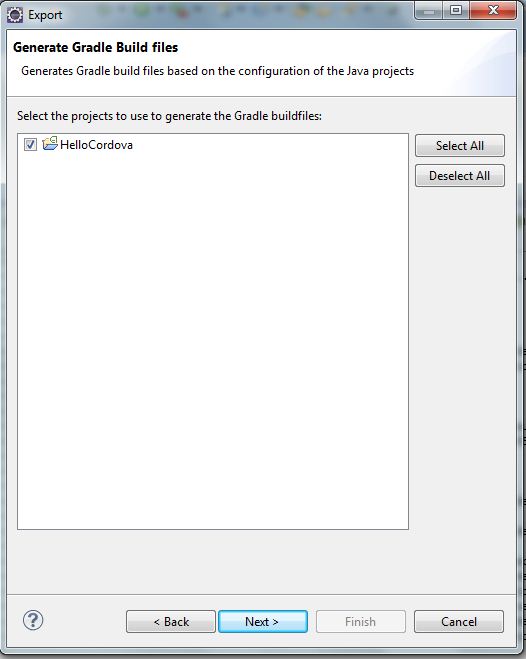
Your selected project remains in
the same location but now contains a build.gradle file and is ready
for Android Studio.

Importing into Android Studio
Launch the Android Studio IDE with Administrator role. Right now there are some permission issues with user roles other than Administrator which is expected to be fixed in the next version of Android Studio (0.2.6).
Click on Import Project.

Locate the project you exported
from Eclipse, expand it, select the build.gradle file and click OK.

In the following dialog, leave Use gradle wrapper selected and click OK. (You do not need to specify the Gradle home.)

It will take some time to complete the import since it will do the necessary downloads for Gradle if you are using Android Studio for the first time. Also,it will take some time to complete the indexing of the files. Android Studio is slow in doing this.
Running Project from Android Studio
Once the project import is completed, click on the run button in the menu bar.

Android Studio will ask for the device in which the application needs to be launched from the list of AVD's available on your system.

Select the emulator on which you want the application to run and Android Studio will launch that emulator, install the application into that emulator and will run the application in the emulator.

We have just created a blank Cordova Android project and so will just see the screen above. In the later posts we will modify the project and view the changes in the emulator.
Subscribe to:
Posts (Atom)